Most of the people on WordPress, be it a user or a professional, are always trying to find some ways to manage their sites as effectively as possible.
Because of this reason, almost every one of them usually uses a tool that helps them to create automatic backups and bulk update on their site. Another area, which the WordPress admins want to speed up, is the process of uploading images and files on their respective website.
While copying and uploading multiple files will not give you a headache, but, copying more than 50 files at once surely will. For those people who do not know, WordPress generally comes with a built-in function that helps you to perform a bulk file upload.
However, it has an upload limit of only 2 MB, thus, if you are trying to use some HD photos on your website, you will not be able to upload it.
Nevertheless, like any other problem, this one can also be solved only by following a few steps. Here are the steps, which you need to follow, to successfully bulk upload file to the WordPress media library.
First Step: Connecting to the Website via FTP
The first and one of the most important steps to upload file to the WordPress media library is to connect to your WordPress website via SFTP or FTP. SFTP, also known as Secure FTP, works in the same way as FTP, but, is known to be a bit safer.
To complete this first step, you will need only two things. These are:
• FTP Password and Username: Both the FTP username and password are naturally important for this procedure. You will be able to get these two things from the documentation of your hosting account or you can also ask about it to the support team of your WebHost.
• An FTP Client or Program: You can use the FTP programs; however, using FileZilla is highly recommended as it is completely free of cost and known to be extremely efficient.
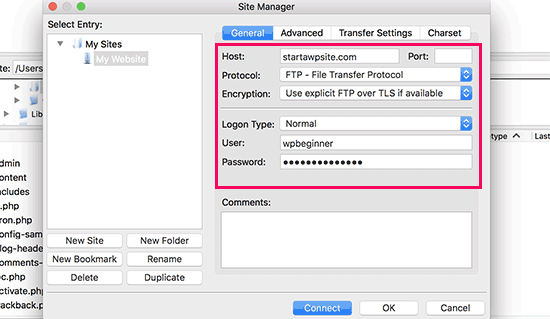
Once you have gotten a hold of these two important things, you can launch the FTP client and fill up all your credentials at the top. Listed below are the boxes which you will have to fill up after opening the FTP program.
• Host: It is the URL or the domain name of your website or the IP address of your server and will look something like ftp.yourdomain.com.
• Password: You will be able to get this from the host of your website.
• Username: It is the username of your FTP account and will be provided by your website's host.
• Port: You can leave this as it is; however, if your host has provided you some information on this, then you can also use it to fill this box up.
After entering all of your login details, you can click the ‘Quickconnect’ button to establish the connection between the server and your website through the FTP program.
Second Step: Uploading the Desired Files to the WordPress Content/Uploads Folder
It might take a little while to connect your website with the server. You will be able to confirm this by looking at the message ‘Status: Connected to ftp.yourdomain.com’. However, once the connection has been established, you can move onto the next step.

The second step to upload file to the WordPress media library successfully is to upload all of your files to the ‘contents’ folder, which is situated in your WordPress website.
To complete this step, you would have to browse for the folder first by using the folder tree of your FTP client. Once you have found the folder, you will be able to upload the files on the WordPress ecosystem by using three different methods.
These are:
• You can upload the files directly to the ‘contents’ folder
• You can utilize the ‘date folder’ which are automatically created by WordPress
• You can create a new folder and upload the files there
These methods do not come with any particular issue as long as you are uploading the files into the ‘contents’ folder or in one of its subfolders. To upload the files in the correct manner, you would simply have to drag them from the tab called ‘the Local Site’ to the tab named ‘Remote site’.
Third Step: Install a Plugin
Once the FTP client finishes uploading, all of your files will go live on the server. However, when you go into your WordPress ‘media library’, you will not be able to find them. This problem can be easily fixed with a plugin.
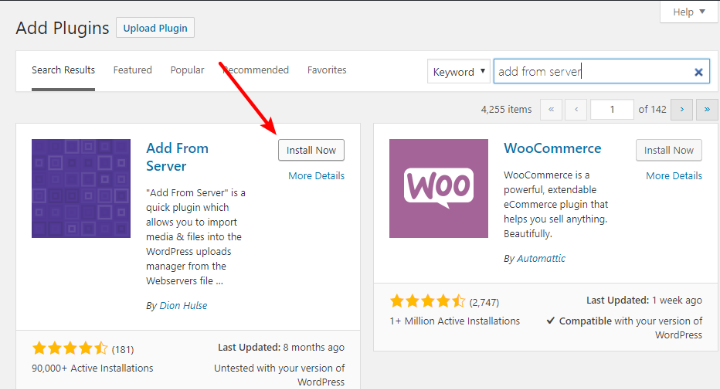
So, the next step to upload file to the WordPress media library is to install a plugin, which can help you to import and register your files to the media library. You can use the ‘Add from Server’ plugin for this purpose. It is free and is quite easy to use.
To install this plugin, you would simply have to search for it on your dashboard and click the ‘install now’ option, which you will be able to find right beside the icon of it. The last step to install this plugin is to click on an option called ‘activate’.
Final Step: Import Your Files by Using the Plugin
Once you are done with the installation of the plugin, it is now the time for you to utilize it. You can start the fourth or the final step to upload the files to the WordPress media library by accessing the interface of the plugin. To do this, you would have to go to Media first and then click on the ‘Add from Server’.
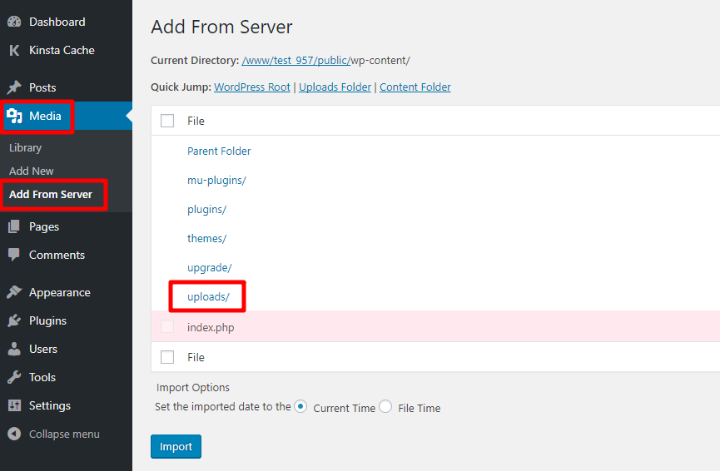
After entering, you will see a list of folders of your WordPress Directory, among which, you would have to click on the ‘uploads’ folder. Now, you will need to browse the folder where you had kept your files via FTP.
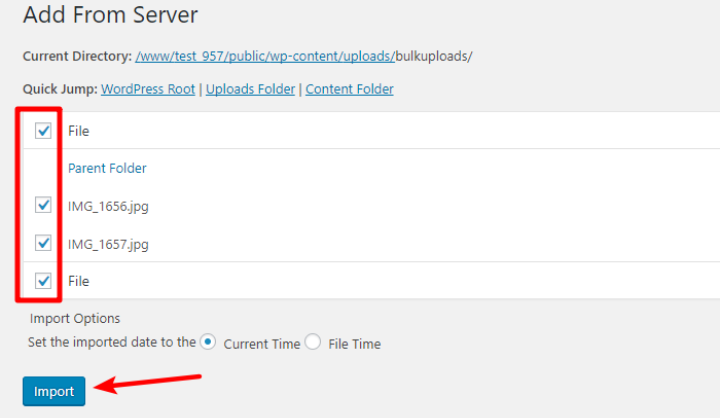
Once you have entered in the folder, you would have to check the boxes of these two options:
• All files
• Individual files
After that, you will only have to click on the ‘import’ button to complete the process. The process might take some time if you are trying to upload a large number of files. However, once it finishes the task, you will see a success message.
So, these are the steps which you would have to follow thoroughly to bulk upload your files to the WordPress media library. However, before uploading, do not forget to ameliorate your images by using an image editor. This will help you to not only maintain the quality of your photos but will also help to quicken the overall process.