WordPress usually comes with a lot of plugins, which are quite capable of optimizing your website's images for SEO purpose.
These plugins can also help you to make your site appear attractive as well as load faster to provide your clients with excellent user experience.
However, due to some usual image issues, you might face difficulties while using them. These common image errors are also known to slow down the website, which can affect the blogging experience of both the owner of the site as well as their users.
Thus, the first thing, you would want to do to make your website more accessible, is to fix common image issues in WordPress.
Here are some of the tips that can help you with this.
Steps to to Fix Common Image Issues in WordPress
1. How to Upload the Images in Your WordPress Website?
The images generally play an extremely crucial role on the WordPress websites. They make a blog post look more attractive and help to keep the users engaged with the post.
Thus, to allure more users to your website, you would have to place relevant images in your blog.
After reading until now, you might feel quite intimidated. However, you will be happy to know that this process is very simple and can be done by using two easy methods. These are:
Drag and Drop
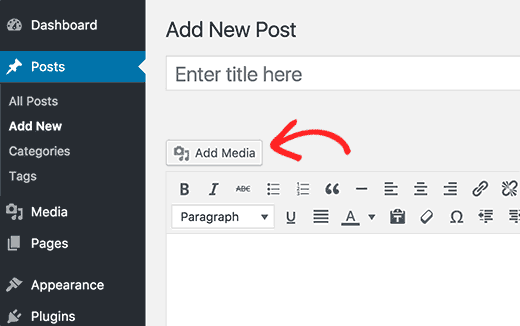
If you are thinking to use this method, then, at first, you would have to go to the ‘media’ section of your website and click on the ‘Add New’ option.
After you are done, a brand new window will appear on your dashboard. Now, you only have to drag a media file from your PC and drop it on the writing ‘Drop files here’.
Select Files
If you are uncomfortable with the previous method, then, you can also opt for this one. To do this, you would again have to go to the ‘media’ section and press on the ‘Add New’ option. Once you are done, a new window will appear on your screen, just like before.
However, now you will need to click on the ‘select files’ option and upload the desired image on your website from your PC. This is one of the simplest ways to fix common image issues in WordPress.
2. How to Add a Caption below the Images?
The term ‘captions’ are generally referred to those texts, which are used to describe the images that you have uploaded or are going to upload on your website.
Adding a caption to your images is very important for your website as it helps to improve the accessibility of your website. Because of this reason, WordPress comes with a built-in function that assists you to add captions in your images quite easily.
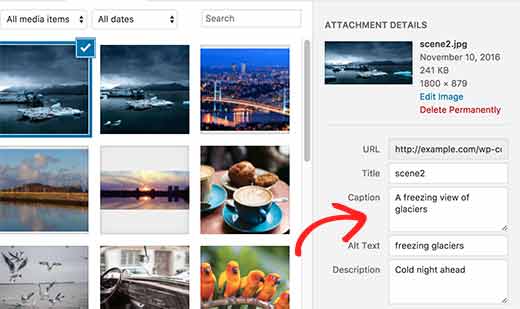
To add captions to your images, you would have to go to the media library of your WordPress website and select an image.
Once you are done with this step, you will be able to find a new page, which will contain all the attachment details of the image, such as the image URL, alt text, title, and caption. To optimize the image, you would have to enter proper details on all the fields.
While you are working on this page, you might also be able to find an option called ‘Delete Permanently’, which will be situated at the bottom of the page.
As the name suggests, this option can be used if you are thinking to remove an image permanently from your website.
3. How to Crop the Images on Your WordPress Website?
One of the easiest ways to fix common image issues in WordPress, which generally occur while uploading a photo, is to optimize the media file by cropping it. This can be done by using the basic cropping feature of WordPress.
To use this feature, you would have to first select the image, which you are thinking to crop and click on the ‘edit image’ link to go to the editor screen.
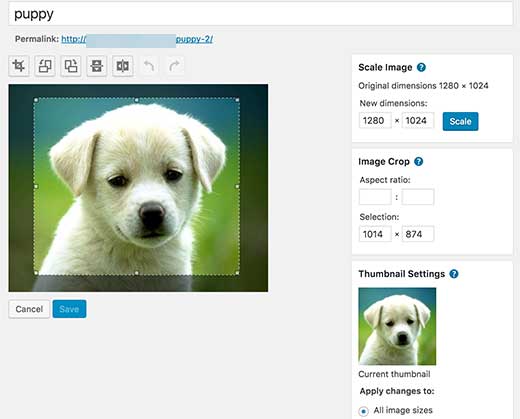
Once you have entered in the editor screen, you will be to see some buttons situated above the image. With these buttons, you will not only be able to perform cropping but also image resizing and rotating.
Once you are done with the editing, you can click the ‘Insert into post’ to add the photo to your page or any particular post.
4. How to Perform Proper Image Alignment?
The captions and descriptive texts play a crucial role in improving the SEO of your WordPress website.
However, if you are thinking to enhance the user experience of your site, then you would also have to align all the images in a proper and eye-catching manner.
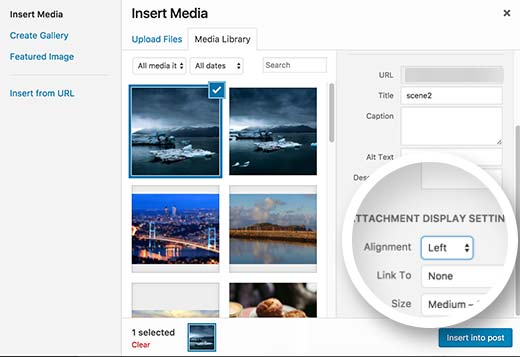
To do this, you would only have to follow three steps. These are:
• Step 1: Select an image from your website’s media library. After clicking, you will be able to see numerous options on the right side.
• Step 2: Go to the ‘Display Settings’ section and click on the box of ‘Alignment’ to open a drop-down menu. You will be able to find three options there- left, center and right. Choose that option which you think to be appropriate.
• Step 3: After making the changes, click on the ‘Insert Into Post’ option.
With these steps, you will also be able to change the alignment of those images, which have already been posted on your website.
5. How to Fix the Missing Featured Image or Post Thumbnail Issue in WordPress?
Some of the WordPress themes allow the users to add a featured image on their writing, to enhance the overall quality of the blog. However, due to some problems, the featured image of a post sometimes might get deleted.
Thus, to fix common image issues in WordPress of missing images, you would have to first go to the ‘edit post’ option and find the ‘Featured Image’ panel, which will be situated at the bottom of the page.
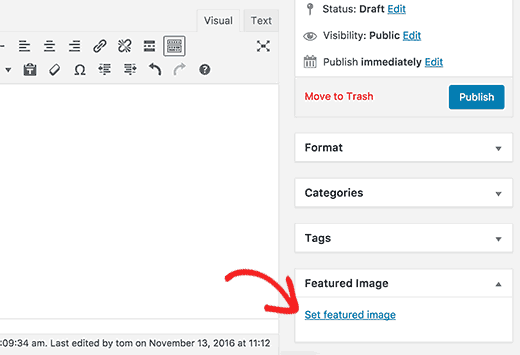
After finding it, you need to click on the ‘Set featured image’ option and select a photo from your website’s media library. Once you have selected the image, you have to click again on the ‘Set featured image’ to proceed.
6. How to Change or Add a Header Image in Your WordPress Website?
As the name suggests, the header images generally sit at the top of all the posts and pages of your WordPress site. Thus, it is the very first thing that your users, as well as other users, see. Because of this reason, it is very important for you to choose and add a header image wisely.
To add or upload a header image, you would have to first log into the dashboard and click on the ‘appearance’ option. After that, you would have select ‘customize’ to find the ‘Header Media’ option.
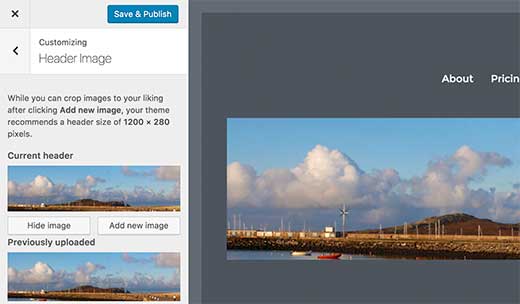
Now, to upload a new photo, you would have to click on ‘Add new image’. As mentioned before, to attract new users to your website, you should always choose a photo that can correctly define your website.
However, if you already had uploaded a photo and want to change it, then you have click on the ‘Hide Image’ option to remove the old image and add a new one.
7. How to Get Rid of the Default Image Link?
When a user uploads an image for the first time, WordPress creates multiple copies of it for using it in various other places of the site. However, while doing this, the platform also adds a link to the actual image by default. To disable this link manually, you would have to first go to the ‘Attachment Display Settings’ and click on the ‘Link to’ option.
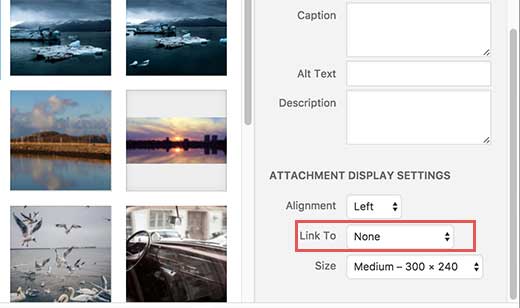
Once you click on it, a dropdown menu will open. From all the options of the menu, you would only have to click on ‘none’ to remove the link.
However, doing this manually for every time you upload a photo, can be quite distressing. Thus, to prevent WordPress from adding links permanently, you can add this code in the functions.php file:
function wpb_imagelink_setup() {
$image_set = get_option( 'image_default_link_type' );
if ($image_set !== 'none') {
update_option('image_default_link_type', 'none');
}
}
add_action('admin_init', 'wpb_imagelink_setup', 10);
8. How to Easily Import the External Images in Your WordPress Website?
This question generally comes to mind when a WordPress website owner is migrating his or her site to a new server or a host.
While migrating, you will be able to easily import the post contents, but it is quite impossible to import the external server images. Thus, to fix common image issues in WordPress importing external media files, you would have to use a plugin called Import External Images.
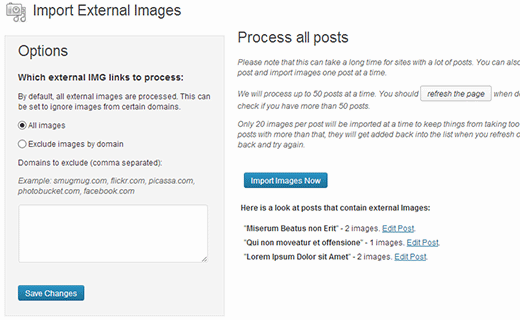
This plugin can help you by making local copies of all the external images and add them, as the gallery attachments.
Once it has made the copies, you will be able to import those images by clicking on the ‘Import Images Now’ option.
9. How to Attach Background Images in Your WordPress Website?
Like the Custom Header Image, the Background Images are also considered to be one of the important branding elements.
Thus, to make your website look more attractive, you would have to go to the ‘Appearance' option first and then to ‘Customize’. Once you have clicked on ‘Customize’ option, a dropdown menu with a lot of options, including ‘Background Image’, will open.
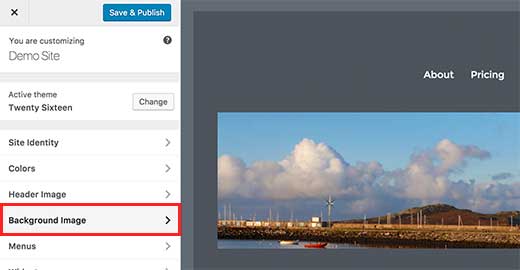
However, some of the basic themes of WordPress do not support this feature. So, if you are unable to find the ‘Background Image’ option, then you simply would have to change your theme.
10. How to Exhibit the Uploaded Photos in Rows and Columns?
The WordPress platform supports a wide range of media gallery styles, which allows the users to display their photos in neat and clean order.
To do this, first, you need to create an image gallery and upload numerous images. Once you are done with uploading, you can click on the ‘Create Gallery’ link.
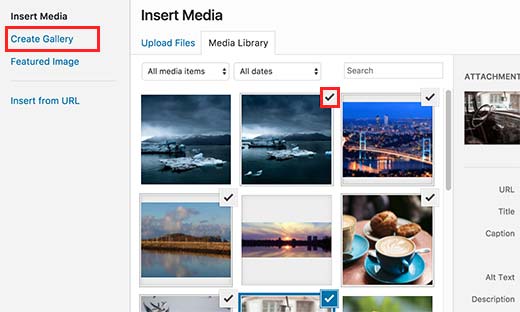
If you are happy with the selection of images, you can click on the ‘Create a new gallery', which you will be able to find at the bottom of your screen.
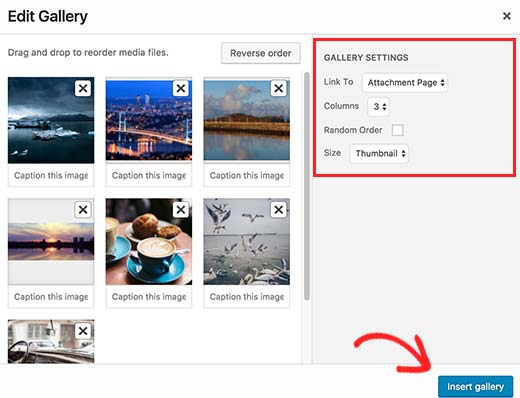
It will redirect you to a panel named ‘Edit Gallery’, where you will be able to choose the size of the gallery photos, thumbnail size as well as the number of columns and rows.
So, these were some of the popular image issues, which most of the owners face, and their solutions.
11. How to Fix Duplicate Featured Image?
Inserting featured image within post editor could be a common mistake created by beginners.
Once you set a featured image, you don’t have to be compelled to insert it into the post editor in conjunction with your post content.
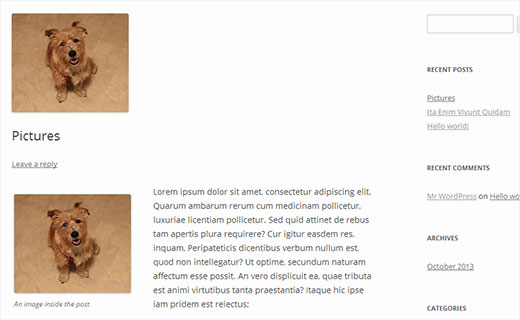
Doing so, can build your featured image seem doubly. Once because the featured image, and once as a picture within the post.
Duplicate featured image in WordPress post
You can add alternative pictures in your post, however your featured image goes within the featured image box.
Just remove the image from the post editor and make sure you use the featured image box to set your featured image.