
When building a website, the things which are most concerned about are the quality of the content, visuals of the layout, and the speed of the website. A promising website attracts the audience when it gives as much importance to the speed as it gives the content.
A website, whether it belongs to entertainment or to the E-Commerce domain, will always have text-based and image-based content.
Images are considered the second heaviest item on a webpage, next to videos. It contributes to about 21% of a webpage’s total weight.
So, the density of images impacts the speed and performance of a webpage. This article discusses the ways to optimize images for web to provide better speed and performance to the websites.
What is Image Optimization?
Image optimization is described as a technique to save and deliver image files in the smallest size possible without losing the quality of the image. The process may seem complex for most first-time users, but it is a rather simpler technique.
It makes use of various image optimization tools and programs that help to reduce the size and resolution of an image file without any visible loss to the quality and texture.
There are many image optimization plugins to reduce the size of the image even up to 80% of the original size. An ideal optimization technique should balance the file size and acceptable image quality.
How does Image optimization Work?
Image optimization principle works on compression technology like ‘Lossy’ and ‘Lossless’. These are the two most commonly used techniques to optimize images for web.
Either a plugin or script is used to decompress the file size. As a result, it reduces the load time of the page. Lossy compression restores the original file with some loss of data which is claimed to be non-noticeable.
It reduces the size to a greater extent than the lossless technique. The lossless technique restores the file without any loss to the data but reduces lesser size than the lossy method.
While uploading your webpage to WordPress, if you receive a recommendation for optimization or from any speed test tool, then it is apparent that you need to reduce the size of the file.
Why is Image Optimization Necessary?
While there are many benefits of image optimization, there are several important benefits that you should be aware of for successful website functioning.
- Page speed: Image optimization helps you to improve your pages speed’ overall loading speed. If your web page loads slower than your competitors, then it may lead you to a risk of visitor satisfaction loss and result in fewer interactions.
- SEO Result: The image optimization technique helps you to make your website rank higher in search engine results. Search engines usually crawl and index your image-based content. They rank you lower in SERPs if your image takes a long time to load, which will affect your online visibility.
- Bandwidth and storage: Images that are optimized can take up less storage space and also will use lesser bandwidth. These characteristics will help you to reduce the hosting costs and the CDN costs, which distribute content to geographically networked servers.
- Backup: Image optimization will help you to reduce the backup time and backup costs for the content for your website.
- User experience: The user experience is affected by the overall changes in the optimization. If your page takes less time to load the images, it will increase the performance and will enhance the user experience of the audience or customer.
- JPEG- JPEGs are best in showing the complex color photographs on your website. They provide a higher quality image for lesser size. This format uses lossy and lossless optimization. You can also adjust the quality level by balancing the size and quality.
If you are using photoshop, then you can select the ‘progressive’ option while exporting the image. This will load a simpler version of the image in the webpage for the user in contrast to the non-progressive type where the image is loaded in parts.
- PNG: If you need an image with lesser colors or want it to be transparent, then PNG format would be best. It produces higher-quality images, but the file size is larger. It was intended to be a lossless image format but can be used in lossy technique too. Make sure the dimensions of your image are accurate, and go for the option to save it as PNG 24. If there is no quality loss in the image, then PNG 8 will be fine too.
- GIF- It is the third most common image format on the web. It only works in 256 colors, so users need to be selective while picking this format to optimize images for web. It only supports lossless compression. It is the best option for animated images and depictions.
The optimization of GIF images needs logical thinking as to whether they loop and need to consider how many GIFs you really need on a particular page or site.
- Adobe Photoshop- Well renowned editing and design software.
- Affinity Photos- Alternative to photoshop, which offers similar features at lower prices.
- Paint.NET - Freeware raster graphics editing by Microsoft.
- Gifsicle- Efficient command-line program for creating and editing GIFs.
- JPEGtran- Command-line utility for JPEGs.
- OptiPNG- Efficient PNG file optimizer that recompresses files to smaller sizes.
- Trimage- Cross-platform GUI and command-line program for image optimization.
- ImageResize.org- Best online image resizer of higher quality.
- FileOptimizer- Lossless file size reduction that supports most format files.
- Gimp- Free, open-source, cross-platform graphics editor similar to Photoshop.
- Use plugins on WordPress which use external servers for optimization purposes, as it can help to reduce the load on your website.
- While using JPEG and PNG formats, try using vector images alongside it.
- Use a Content delivery network (CDN) to deliver the contents around the globe by using a geographically specific server network.
- Reducing unnecessary image data can help reduce the size of the image.
- Lossy compression should be preferred whenever you can.
- For images with lots of shapes and colors, use raster graphics for decent optimization.
- Removal of unwanted metadata for images will help a lot in speeding up the loading.
- In Photoshop, saving images as optimized for the web will be of great help in improving the loading time of images on the web pages.
- WebP in chrome option helps in serving the images in a smaller format.
- Automating the process will be useful in getting the desired output.
- General photos and screenshots must be saved in JPG.
- Photos with great details and high resolutions should be saved in PNG.
- Animated graphics should be saved as GIFs.
- A smaller color palette should be used to reduce the bit-depth.
- CSS3 effects are handy in providing optimization.
- The white space which is unnecessary should be cropped, and the space should be recreated in CSS through the padding option.
How to Optimize Images?
There are various steps you can take to optimize images for web to boost your website’s performance and ranking. Let us look into the ways one by one.
Benchmarking the Current Speed of the Site:
Before you begin the process of reducing the file size, it is important to mark the current file size and performance of the site. The first step is to run a speed test to check the performance of the site.
After you made the changes to the site through optimization, you could look into the improvement and take successive steps. Google PageSpeed Insights, Pingdom tools, WebPage test, and GTMetrix are some of the best tools you can use to check the speed of your web page.
Choosing the Best File Type:
After you create an image on an image processing software, you are provided the option of choosing the file type through which you can export the file. Some of the common formats of images used in web services are JPEG, PNG, and GIF.
Each of the aforementioned formats will have its own pros and cons when uploaded to the web pages. You can select the best format to optimize images for web for boosting the performance of the site.
Manual Image Resizing:
Resizing the processed image is one of the easiest methods to optimize the image. When typically working on a raw picture taken in a DSLR camera, the dimensions of the images are not necessarily accurate as we want them to be. The dimensions are, instead, much larger than we actually need them.
File size can be decreased by cropping the images before uploading them to the site. It will reduce the pixel amount of the image and produce a file that can take less storage to be stored. Common image editing software like photoshop is sufficient to optimize images for web by resizing and cropping.
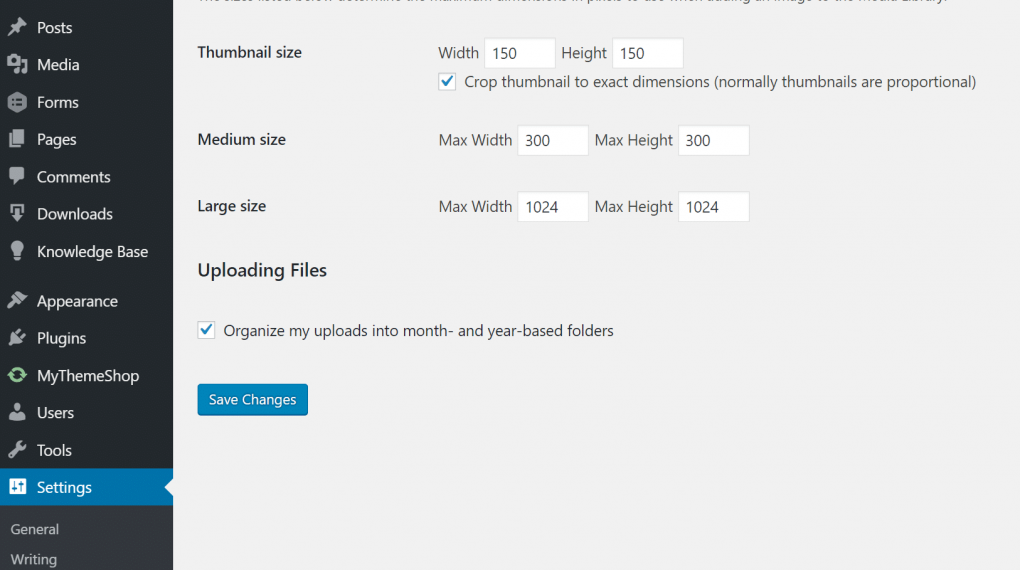
Earlier it was necessary for users to upload their images to scale without allowing the CSS to scale down the images. But now, WordPress 4.4 allows the feature of responsive images.
The WordPress site creates several sizes of each image which are uploaded to the media library. A secret attribute contains the available sizes for the image, and the users can download the exact size by ignoring the others.
The WordPress media library provides a way to create thumbnails depending on your settings. The original image is still retained.
However, if you opt to save your disk storage space by deleting the original, then you can use a plugin called Imsanity. It will help you to store all the uploaded images on the site to be constrained within a reasonable size.
Also, the Media Cleaner plugin allows you to save space by cleaning up your media file library. It implements the smart trashing system where the unwanted files which are deleted are moved to a temporary directory.
You can test the performance of your website, and if you find something missing, then it is easy to restore the deleted files from the trashing system.
Ideal Resizing Rules of Thumb:
Finding the right size and balancing it between the quality is the most crucial part of image optimization. In order to optimize images for web, it’s important to understand the term ‘size’.
The term itself is a relative concept that depends on the platform that uses the file. Most of the time, what we need for printing is much more than what we need for the websites.
The optimal file size for large images should be no more than 1 MB. Most of the other smaller graphics can range up to 300 KB or less. If your focus depends on the pixel rate for a full-screen image, the recommended size of the image is 2000 pixels.
There are options for image saving where it states, ‘Save for web’. This option will help you to save a web-friendly format for uploading.
Image Optimization Tools and Programs:
You can use numerous tools and programs to optimize images for web, which are both premium and free. This list of some best programs and tools will help you to choose a suitable application for your optimization process.
Image Optimization Plugins:
While using WordPress, you do not have to worry about fully optimizing and reducing the size of the image for your website. There are numerous plugins in WordPress that help you to optimize images for web beforehand and then give you support while uploading them to your site.
There are some plugins that optimize the images even after you have uploaded them. It is important to consider that you should not fully rely on such plugins for maximum optimization. Uploading a 2MB size file can take up your disk space fast.
The right method is to optimize the image with image editing software first, then upload it to the site and use the plugins to optimize it further. There are some important plugins listed in this article to help you select the best plugin for your web page.
1. Imagify image optimizer:
Imagify is an image optimizer tool that is supported by WooCommerce and is retina-ready. It sports a bulk optimization feature that can allow you to choose between three levels of compression, which are named- Normal, heavy, and ultra.
It has a restoring option and recompress facility. The imagify software also optimizes the images on their company’s third-party servers. It helps in the fast loading of images on your WordPress site.
2. ShortPixel image optimizer:
![]()
The ShortPixel image optimizer is a flexible and free optimization tool that is used to optimize images for web. It can compress 100 images per month.
It can compress multiple types of files such as PNG, JPG, and also PDF files. It can perform both lossy and lossless compression techniques. It will also convert CMYK to RGB colors.
The processing method involves the tool taking your images and graphics to the cloud and reducing the size for optimization. The files are then brought back to your site after optimization and replaced with the original. It also creates a backup for you to restore the files.
3. Optimole:
Optimole is a WordPress plugin that automatically reduces the size of your images without requiring any work from your end. This tool greatly helps in increasing the load speed for your website by showing the images at the right size.
It can also downgrade the image quality if the visitor has a slow network speed. The images are served through a fast CDN.
4. WP Smush:

The WP Smush is an excellent image reduction plugin that helps to remove hidden information from images and reduce the size of the images.
It scans images that you upload to the site as well as the images you have already uploaded to the site to reduce the size. It provides a manual smush feature, and it can support file types of JPEG, PNG, and GIF.
It has a file size limit of up to 1 MB. The optimization is done with the lossless reduction technique. It supports a wide range of library media plugins such as WP all import and WPML. All of your images get set to identical proportions as it can automatically set height and width.
5. TinyPNG:

TinyPNG is an image optimization plugin that uses the TinyJPG and TinyPNG services to optimize the images in JPG and PNG formats. It can automatically compress new images that you add and also bulk-compress older images that are uploaded to the site.
It will convert the colors from CMYK to RGB for better storage in the disk. Without loss, it is capable of reducing JPG images to 60% and PNG images to 80% of the original size.
6. EWWW Image optimizer cloud:
The EWWW Image optimizer cloud is an image optimizer that is helpful in the starting of your site faster by making your images look smaller. This plugin has no size limit, so you can use its flexible features default settings and can customize the plugin based on your needs.
You can use the bulk optimizer to compress the existing older images or the options in the media library list mode to optimize a specific image. You can also create additional folders to scan your image files.
7. ImageRecycle:
The ImageRecycle plugin is used to optimize images for web, which can also process the image automatically. It can also optimize PDF files.
You can set the minimum file size for this tool which helps you to exclude certain files from optimization, which will let those images retain their originality.
Auto image resizing and bulk optimization features are also available. The charging rate depends on the number of images compressed.
Using SVG format:
SVG represents a scalable vector format that supports vector images, logos, icons, text, and simple images. This format is suitable to optimize images for web as they are automatically scalable in both browsers and photo editing tools.
It works well for SEO practices as search engines index SVGs the same way as JPEGs and PNGs. They are also composed of smaller image file sizes and hence provide faster loading speed. It can be optimized approximately up to 92% of the file sizes of JPGs and PNGs.
General Practices for Image optimization:
Here is a set of best general practices that can be used by you to optimize images for web and increase the speed of loading in websites.
Optimization of Image Loading:
Even after performing all the general image optimization functions, there are certain cases where the image size is larger, and the speed of your site is slower.
Image optimization may not be the optimal solution at these times, so it is helpful to take a couple of techniques for image loading speed optimization.
These techniques are useful in giving the user an experience of faster loading of images and also to optimize images for web. The following two techniques are based on this principle.
Blur up technique:
This technique gives the appearance that the loading is faster than it actually is. One of the techniques uses the method called Lower Quality Image first (LQI). A smaller version of the image is loaded first so as to offer the audience something to look at during the wait for the bigger details.
This will cause a perception that the images are loading at a faster rate when in actuality, all of the images are loading at the same rate.
Lazy Loading:
This technique loads the images at the browser view first and loads the other images after it. The visitor, when visiting the site, will focus on the top first.
And the images are loaded in the order of the scrolling.
This will create a perception that images are loading at the fastest rate possible.
Conclusion:
When opting for methods to reduce the size of images and correction of quality, it is important to note that the balance between the reduced size and quality must be maintained. A decent image optimization technique enables you to provide the smallest size of the image with the highest quality possible.
This should also help you to speed up the loading time. Using tools and programs to optimize images in your own environment, uploading them to the site, and having them optimized using plugins is the best way. So, we hope the article was insightful enough to help you optimize images for web.